
New Developments in Tightness Auditing of Joints

Recording torque-angle plots during a torque audit reveals a definite distinction between aluminum and painted steel wheels. The aluminum wheels tend to maintain their initial clamp force values better than the painted steel wheels after the testing and heat cycles. The aluminum wheels also tend to have a stronger resistance to slip (slipping between the washer and the wheel, clocking the stud back and forth).
Note: Test data relates to two-piece lug nut/flat washer combination such as found on heavier industrial trucks widely used in Europe and the United States.
The slipping appears to be caused by changing frictional characteristics in the joint. The joint is designed to have the washer remain flush against the wheel face, leaving the crowned surface between the nut and washer as the bearing surface. As the wheel heats up, friction changes between the wheel and the washer creating a surface that has less friction than that between the nut and washer, thus changing the bearing surface of the joint. This slipping is directly related to the large tension losses.
The frictional changes in the joint can be seen in the torque and angle deviations from breakaway audit studies when performing an M-Alpha analysis. The following describes the frictional changes determined by M-Alpha methods.
Using M-Alpha Analysis Methods to Describe Frictional Changes
The torque applied to a fastener must overcome the friction in both the underhead region and in the threads to produce tension in the joint. The torque is broken down into three parts: underhead friction torque, thread friction torque, and pitch torque (the torque used to produce tension). Figure 1 shows the elastic region of a torque-angle signature projected back to the elastic origin and breaks out the torque values.
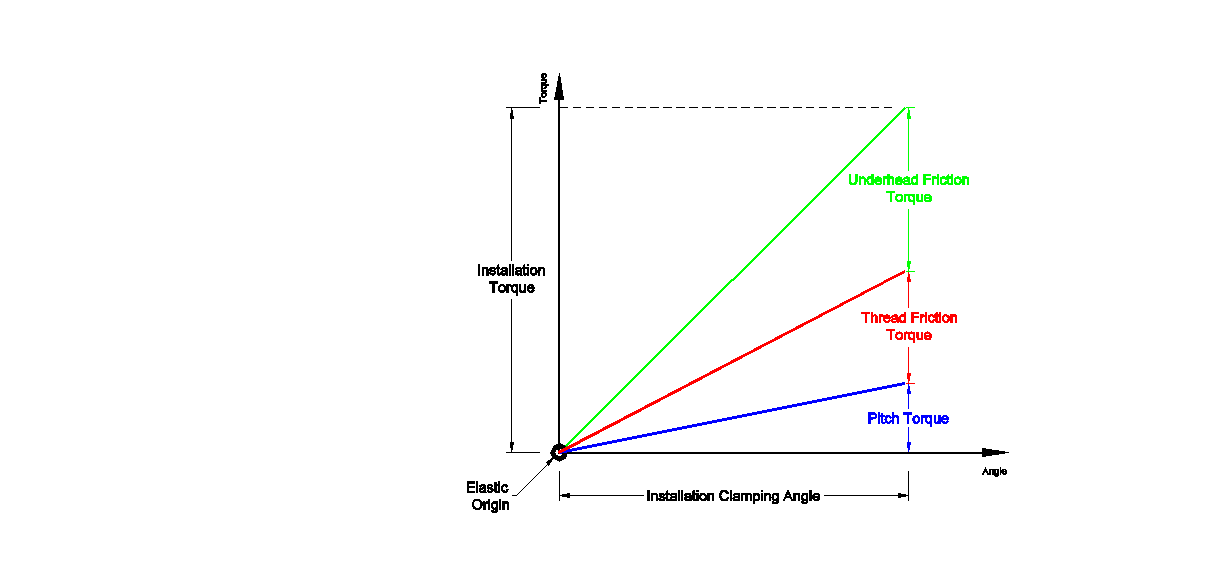
Figure 1. Torque Breakdown to Produce Tension
Figure 1 gives a generic representation of the tightening of one of the wheel studs. After track testing and heat cycles the clamp angle will either stay the same or decrease, while the torque can increase, decrease, or remain the same. Since the same joint is being tested, the changes mentioned above are caused by friction changes. It has been established that thread friction changes can be considered negligible; therefore, only underhead friction changes will be discussed. These are explained below:
Decreased Torque & No Clamp Angle Change
After performing an audit, if the torque value decreased but the clamp angle remains unchanged, the underhead friction decreased as shown in Figure 2.
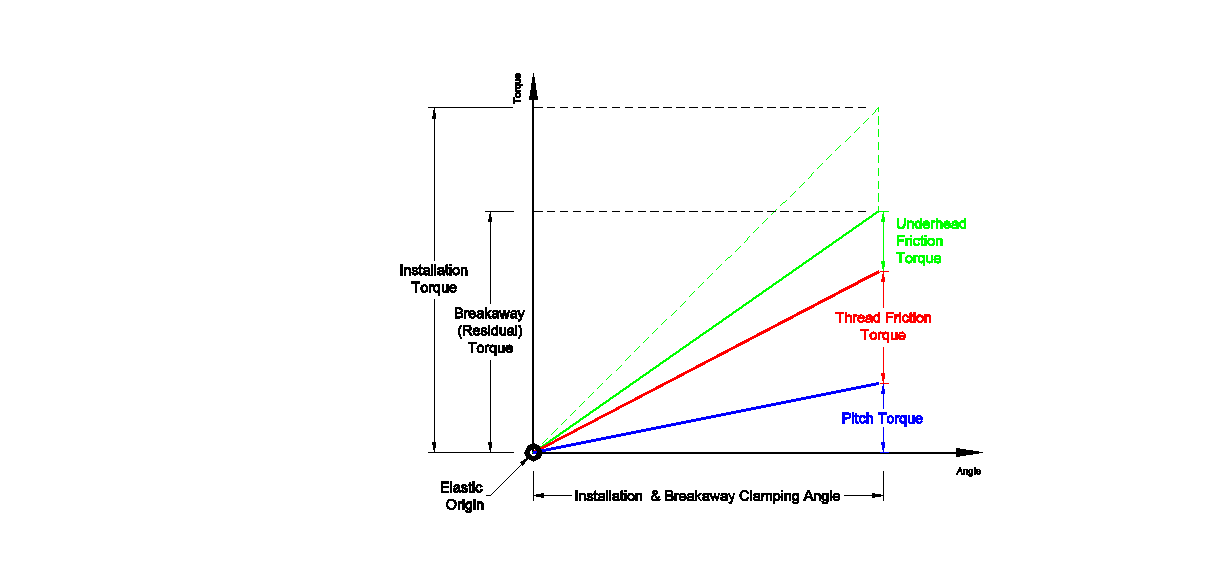
Figure 2. Decreased Torque & No Clamp Angle Change
The scenario in Figure 2 indicates that the tension in the joint remained unchanged, but the change in underhead friction may lead to slipping.
Torque Increased and Clamp Angle Decreased
After performing an audit, if the torque value increased and the clamp angle decreased, the underhead friction increased as shown in Figure 3.
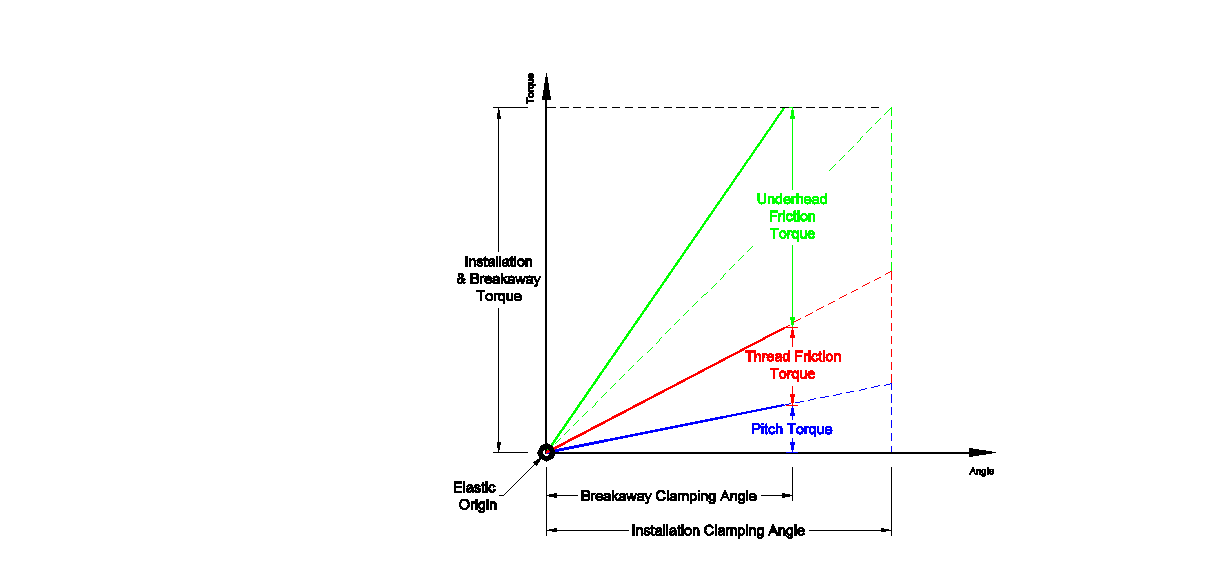
Figure 3. Torque Increased and Clamp Angle Decreased
The scenario in Figure 3 indicates that the tension in the joint decreased. The increase in underhead friction may be due to some sort of curing between the coating and the nut. However, this does not mean that the clamp load increased.
Torque Decreased and Clamp Angle Decreased
After performing an audit, if both the torque value and the clamp angle decreased, then the underhead friction decreased as shown in Figure 4.
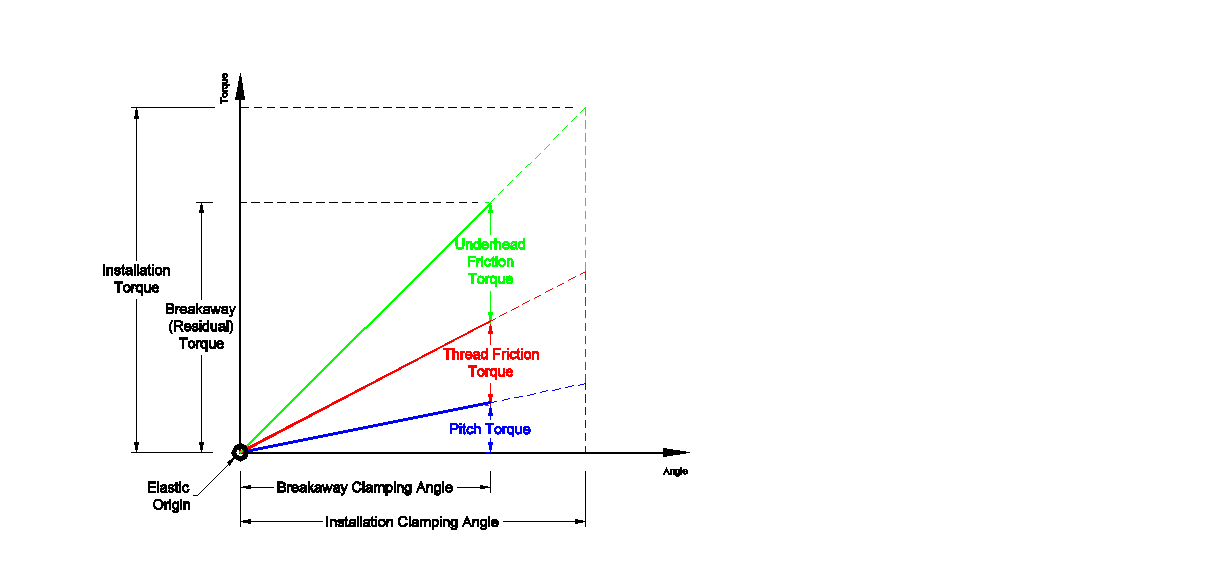
Figure 4. Torque Decreased and Clamp Angle Decreased
The scenario in Figure 4 indicates that the tension and the underhead friction in the joint decreased.
From this analysis, it can be seen that temperature of the joint being tested is relatively negligible when it comes to clamp load values. Therefore, when monitoring clamp load it really does not matter if the audit was performed hot or cold. The torque value will change due to the change in underhead friction as the temperature cycles. The following will demonstrate this.
Comparison of Breakaway and Release Audits at Hot and Room Temperatures
The following example explains how clamp load auditing is unaffected by the temperature of the joint. By using M-Alpha auditing methods, a breakaway audit in the tightening direction at a hot temperature will be compared to a release audit at room temperature. Figures 5 and 6 show the breakaway and release audits at different temperatures of the painted steel wheel. Keep in mind that the breakaway audit adds ten degrees to the clamping angle and therefore needs to be considered when looking at the release audit signature.
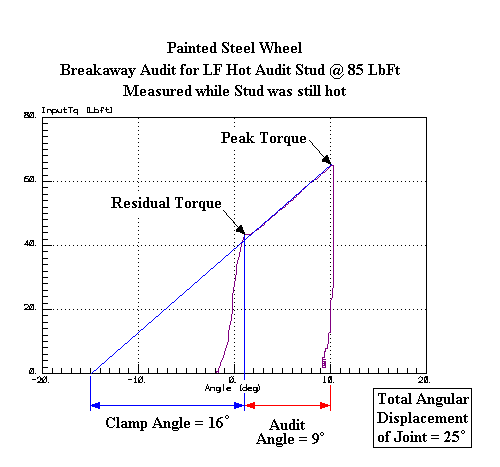
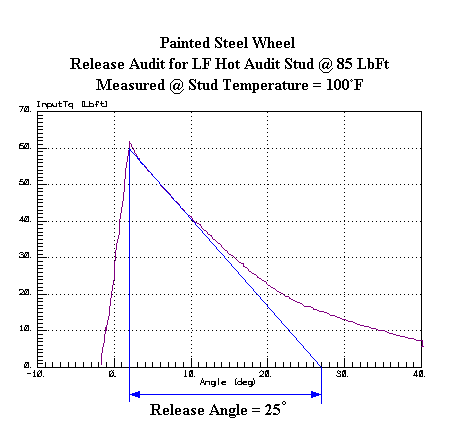
Figure 5. Breakaway Audit @ Hot Temp Figure 6. Release Audit @ Room Temp
In Figure 5, the residual clamp angle is 16 degrees. This is combined with the additional 9 degrees produced by the audit for a total of 25 degrees. The joint was left to cool and a release audit was performed (refer to Figure 6). The clamp angle for the release audit measures 25 degrees indicating that there was no clamp load change by cooling off the joint.
Figures 7 and 8 show the same example on the rear wheel.
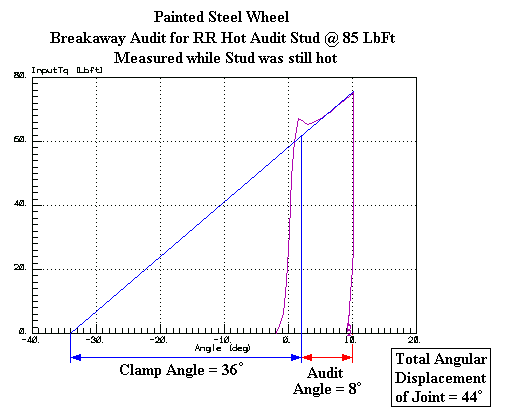
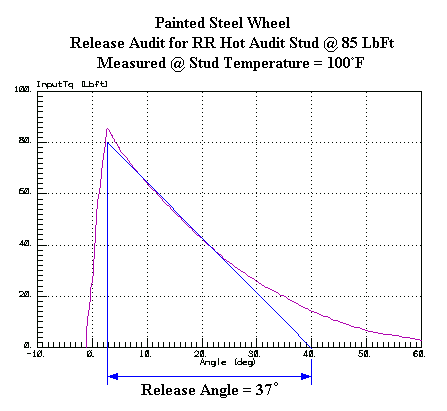
Figure 7. Breakaway Audit @ Hot Temp Figure 8. Release Audit @ Room Temp
In Figure 7, the residual clamp angle is 36 degrees and the audit angle is 8 degrees. Added together gives the joint a 44 degree clamp angle after the audit. The joint was allowed to cool and a release audit was performed (refer to Figure 8). The release audit gave a release clamp angle of 37 degrees. This indicates that the joint actually lost clamp load as it cooled.
Comparison of Hot and Ambient Temperature Audits
Audits on joints using M-Alpha procedures are performed to determine the amount of tension in the assembly. The amount of tension or clamping force exerted by a fastener when it is tightened is what actually holds the assembly together. Once the assembly is brought together, the fastener responds like a tension spring and the assembly acts like a compression spring. This interaction of the fastener and the assembly can be illustrated as shown in Figure 9. As the fastener is turned and load is applied, the fastener is stretched and the parts are compressed. This results in an elastic joint in which the fastener is the flexible member and the assembly is the rigid member.
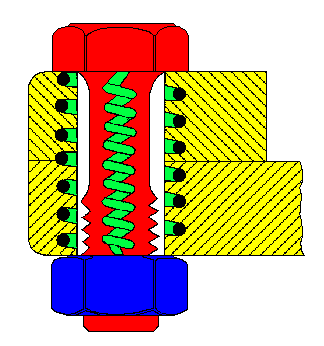
Figure 9. Spring Affect of Bolted Joint
As the joint is heated, the clamping plate material expands causing a temporary increase in tension. As the joint cools, the clamping material retracts causing the joint to return to its original state (assuming no material flow from under the bearing surface). If material flows from the bearing surface then less material will be between the bolt head and nut, creating air gaps and thus tension loss.
When the joint (in this case, a wheel/fastener assembly) is heated, the wheel coating tends to act as a lubricant between the wheel surface and the washer. Performing a torque audit at that point produces torque values considerably lower than the installation values. Waiting for the joint to cool before auditing allows the coating to cool and possibly respond with a curing affect between the wheel and the washer producing similar torque values to the installation value.
Using M-Alpha methods of auditing considers the torque and the angle of turn from the projected elastic origin, which takes the temperature variable out of the picture. As long as no additional torque is applied to the joint, changing temperature causing a change in torque will only change the slope of the line projected from the audit and will not change the angle of turn in the fastener. If there is no increase in angle of turn (no additional torque added to joint) then the fastener will not be further stretched and clamp load will not change.